An Introduction to Reproducible Research in R and R Studio.

**Updated 4th April 2016**

I have recently volunteered to give a few talks on how straightforward it us to conduct research in a reproducible manner using R and the R Studio environment. This talk covers the following topics:

  • What is reproducible research, and why should we do it?
  • Four simple rules for reproducibility.
  • A step by step guide for conducting reproducible research in R Studio

I intend to write on this topic in more detail in a future post, but for now if you are interested in changing the way you do research in R Studio, feel free to have a look through the slides below, which you can also download from here:

Make R beep when R Markdown finishes – or when it fails.

I often run time-consuming scripts, so I’m a big fan of ‘s Rasmus Bååth beepr package in R. I often put beep() at the end of my .R files to let me know when analyses are done.

However, when using R Markdown and knitr in RStudio, this is a poor solution when there is an error somewhere in my script. This is because knitr will terminate its R session before it gets to my beep() line at the end.

One way to get around this is to assign what R does on an error and what it does when it runs an .Rmd script successfully. Once the beepr package is installed, running the following markdown chunk at the beginning of the file will make .Rmd beep when it exits normally, or due to error:

```{r echo = F}
options(error = function(){    # Beep on error
  beepr::beep()
  Sys.sleep(1)
  }
 )

.Last <- function() {          # Beep on exiting session
  beepr::beep()
  Sys.sleep(1)
  }
```

The reason Sys.sleep(1) is there to give knitr some time to actually play the sounds before terminating.

NB. If you accidentally set this in your workspace outside knitr (i.e. running chunks in the console), getting a beep on every error can be super annoying. In that case, reset it with the following code:

options(error = NULL)

Hope someone finds this useful!

Step by Step: A Stylised Pedigree using reshape and ggplot2

During a minor bout of procrastination, I produced a stylised pedigree using Hadley Wickham's amazing reshape and ggplot2 packages in R. Not being particularly artistically minded, I was quite chuffed with the end product:

I’ve had a few requests for the code, so in this post, I provide a step by step guide describing how the graph was produced. In a nutshell, it shows all ancestors and descendants of a single Soay sheep, called “Snowball”, who is indicated by the large dot at the top of the pedigree.

I started with the following data frame, which is a pedigree consisting of Snowball (ID number 2115), its mother and father, all his descendants and their years of birth.

head(pedigree)
##     ID FATHER MOTHER BirthYear
## 1  905     NA     NA      1982
## 2 1721     NA     NA      1986
## 3 2115   1721    905      1989
## 4 2255   2115     NA      1990
## 5 2310   2115     NA      1990
## 6 2447   2115     NA      1991
tail(pedigree)
##        ID FATHER MOTHER BirthYear
## 1597 8966   6563   5526      2012
## 1598 8967   6486     NA      2012
## 1599 8969   5420   6725      2012
## 1600 8970     NA   7485      2012
## 1601 8971     NA   7159      2012
## 1602 8974     NA   6459      2011

To start, I loaded the reshape package and used the melt function to stack MOTHER and FATHER into variable and value columns, meaning that each parent of an individual will have its own individual line. BirthYear is not important at this stage and was not included in id.vars. Lines with NAs occuring in value were removed.

library(reshape)
ped2 <- melt(pedigree, id.vars=c("ID"), measure.vars=c("MOTHER", "FATHER"))
ped2 <- ped2[-which(is.na(ped2$value)),]
head(ped2)
##      ID variable value
## 3  2115   MOTHER   905
## 27 2778   MOTHER  2447
## 38 2922   MOTHER  2447
## 42 2938   MOTHER  2608
## 46 2983   MOTHER  2683
## 47 2997   MOTHER  2683
tail(ped2)
##        ID variable value
## 3191 8856   FATHER  5420
## 3193 8863   FATHER  6486
## 3198 8964   FATHER  6849
## 3199 8966   FATHER  6563
## 3200 8967   FATHER  6486
## 3201 8969   FATHER  5420

The column value indicates the parent ID relative to variable. Next, value is renamed to Parent.ID. To create the lines between an individual and its mother or father, each parent/offspring combination should be identified by a unique “Group” identifier. I did this as follows:

names(ped2)[which(names(ped2) == "value")] <- "Parent.ID"
ped2$Group <- 1:nrow(ped2)
head(ped2)
##      ID variable Parent.ID Group
## 3  2115   MOTHER       905     1
## 27 2778   MOTHER      2447     2
## 38 2922   MOTHER      2447     3
## 42 2938   MOTHER      2608     4
## 46 2983   MOTHER      2683     5
## 47 2997   MOTHER      2683     6

Now we melt again, using "Group" as the id.var, and c("ID", "Parent.ID") as measure.vars.

ped3 <- melt(ped2, id.vars = "Group", measure.vars=c("ID", "Parent.ID"))
ped3[1:10,]
##    Group variable value
## 1      1       ID  2115
## 2      2       ID  2778
## 3      3       ID  2922
## 4      4       ID  2938
## 5      5       ID  2983
## 6      6       ID  2997
## 7      7       ID  3082
## 8      8       ID  3293
## 9      9       ID  3382
## 10    10       ID  3384

This can then be merged with the original pedigree Birth Year information.

names(ped3)[3] <- "ID"
ped3 <- join(ped3, pedigree[,c("ID", "BirthYear")])
## Joining by: ID
head(ped3)
##   Group variable   ID BirthYear
## 1     1       ID 2115      1989
## 2     2       ID 2778      1992
## 3     3       ID 2922      1993
## 4     4       ID 2938      1993
## 5     5       ID 2983      1993
## 6     6       ID 2997      1994

Now it looks like something we can plot – we have the connections between individuals (indicated by Group) and we have their y-axis positions (BirthYear)). But what about the x positions?

My current solution is to create a list of x coordinates that are equally distributed between 0 and 1, but are also symmetrical around 0.5 to aesthetic reasons. So if there are 5 unique individual IDs within a cohort, their x values would be sampled without replacement from c(0, 0.25, 0.5, 0.75, 1). If two individuals, then x would be sampled without replacement from c(0.25, 0.75).

generateXcoord <- function(size){

  if(size %% 2 != 0 & size != 1){   # Check if size is odd
    newsize <- size - 1
    interval <- 1/newsize
    x <- seq(0, 1, interval)
    }

  if(size %% 2 == 0){    # Check if size is even
    interval <- 1/size
    x <- seq(0, 1, interval)[-size-1] + diff(seq(0, 1, interval))/2   
    }

  if(size == 1) x <- 0.5

  x
  }

generateXcoord(4)
## [1] 0.125 0.375 0.625 0.875
generateXcoord(7)
## [1] 0.0000 0.1667 0.3333 0.5000 0.6667 0.8333 1.0000

Now loop through the pedigree and sample the x coordinates. Probably quite inefficient…

 #~~ Create an object to save the x coordinates within
xcoords <- NULL

for(i in unique(ped3$BirthYear)){

  # Extract the number of Unique IDs per year and generate X coords
  ids  <- unique(ped3$ID[which(ped3$BirthYear == i)])
  newx <- generateXcoord(length(ids)) # generate X coordinates

  # Append to xcoords
  xcoords <- rbind(xcoords,
                   data.frame(ID = ids,
                              x = sample(newx, size = length(newx), replace = F)))

  rm(ids, newx)
  }

# Merge with ped3

ped3 <- join(ped3, xcoords)
## Joining by: ID
head(ped3)
##   Group variable   ID BirthYear      x
## 1     1       ID 2115      1989 0.5000
## 2     2       ID 2778      1992 0.4643
## 3     3       ID 2922      1993 0.5556
## 4     4       ID 2938      1993 0.1111
## 5     5       ID 2983      1993 0.6667
## 6     6       ID 2997      1994 0.7083

NOW WE PLOT. Using -BirthYear will plot the earliest years at the top of the graph and group = Group in the geom_line() call will plot the lines connecting parents and their offspring:

library(ggplot2)
library(grid)

ggplot(ped3, aes(x, -BirthYear)) +
  geom_line(aes(group = Group)) +
  geom_point()

Snowball Pedigree raw

First of all, I want to change the parents of Snowball (born 1989) to be plotted on either side. This involves a slightly less automated process of assigning new values to the two parents born pre-1989:

ped3$x[which(ped3$BirthYear < 1989)] <- c(0.25, 0.75)

ggplot(ped3, aes(x, -BirthYear)) +
  geom_line(aes(group = Group)) +
  geom_point()

unnamed-chunk-10

Now to customise the graph. Specifying alpha within geom_line() helps to distinguish the individual relationships within the pedigree.

ggplot(ped3, aes(x, -BirthYear)) +
  geom_line(aes(group = Group), alpha = 0.1) +
  geom_point()

Snowball Pedigree Better

And in true 'How to draw an Owl' style, lets add a shed-load of other specifications. In particular, within theme(), element_blank() removes a particular attribute, and plot.blackground is the key to getting the cream background. scale_y_continuous gives the correct labels for the y axis value and a value for each year. labs(x = "", y = "") is a little hack which removes the axis titles.

And finally, geom_point(x = 0.5, y = -1989, size = 4) superimposes a large point over Snowball:


birthyears <- sort(unique(ped3$BirthYear))

ggplot(ped3, aes(x, -BirthYear)) +
  geom_line(aes(group = Group), alpha = 0.1) +
  geom_point() +
  geom_point(x = 0.5, y = -1989, size = 4) +
  theme(legend.position  = "none",
        axis.text.x      = element_blank(),
        axis.text.y      = element_text(colour = "darkgrey"),
        axis.ticks.y     = element_blank(),
        axis.ticks.x     = element_blank(),
        panel.grid       = element_blank(),
        plot.background  = element_rect(fill = "ivory"),
        panel.background = element_blank()) +
  theme(plot.margin = unit(c(1.5, 1.5, 1.5, 1.5), units = "cm")) +
  scale_y_continuous(breaks = -seq(min(birthyears), max(birthyears), 1),
                     labels =  seq(min(birthyears), max(birthyears), 1)) +
  labs(x = "", y = "")

Snowball Pedigree

Base Graphics in R: A Detailed Idiot’s Guide

One of the most powerful functions of R is its ability to produce a wide range of graphics to quickly and easily visualise data. Plots can be replicated, modified and even publishable with just a handful of commands.

Making the leap from chiefly graphical programmes, such as Excel and Sigmaplot may seem tricky. However, with a basic knowledge of R, just investing a few hours could completely revolutionise your data visualisation and workflow. Trust me – it’s worth it.

Last year, I presented an informal seminar on the basics of R Graphics at University of Turku. In this blog post, I am providing some of the slides and the full code from that practical, which shows how to build different plot types using the basic (i.e. pre-installed) graphics in R, including:

After much wrangling with WordPress, I used the very simple ‘Publish’ button on R-Markdown to host the tutorial on RPubs. This post is BIG, but DETAILED. The Tutorial itself is HERE and all code and datafiles are available here.

Feedback is welcomed. I hope someone out there finds it useful!

An Introduction to R Graphics: Slides

Genetics in old samples: Fish scales and SNP chips.

Biologists are natural collectors. As kids, we jam flowers into heavy books, trap poor bugs in new home-made homes, and curate elaborate collections of sea-shells. As adults, we understand the real purpose of collecting – educating, informing and fascinating.

Insect collection. Photographs by Barta IV

Photograph by Barta IV.

Today, the systematic collection of biological samples have the potential to provide an incredible resource for genetic studies. By extracting DNA from old specimens, including feathers, bones and hair, we could examine a range of subjects, such as:

  • How populations have changed over time;
  • The genetic consequences of population collapses and inbreeding;
  • The impact of interbreeding with non-native individuals.

However, such studies in historical samples have had a reputation for being problematic and unreliable, and for good reason. Over long periods of time, DNA starts to degrade and fragment into smaller pieces, making it harder to screen genetic markers in older samples. In addition, old samples are more open to contamination with related DNA, making the results less reliable.

Fortunately, new genotyping technologies can examine single nucleotide polymorphisms (genetic markers known as SNPs) in much smaller fragments of DNA. But how reliable are these results? Can we really use old samples for cutting edge genetic studies?

Atlantic salmon in the Teno river. Image © Panu Orell

Atlantic salmon in the Teno river. Image © Panu Orell

During my time with the Primmer Group at the University of Turku, I was interested in understanding the evolution of a number of life-history traits in Atlantic salmon in the Teno river system in Northern Finland. But, getting up to such a remote place and collecting enough salmon fitting our study design was just not possible. Instead, we decided to use a pre-existing resource  – a huge collection of thousands of phenotypic measurements and scale samples by the fishermen on Teno river over the last 40 years, curated by the Finnish Game and Fisheries Research Institute in Utsjoki.

Paper envelopes containing salmon scales for our genetic study.

Paper envelopes containing salmon scales for our genetic study. Image: Susan Johnston.

We were excited by the prospect of using new SNP technology in our old fish scales. Initial pilot genotyping looked very promising, but there was the still the worry that somehow, our results could be seen as unreliable. Therefore, we decided to put this idea to rest by formally testing how efficient and repeatable SNP genotyping was.

We set about examining the DNA concentration and fragment sizes in scale samples collected over a 31 year period, repeating DNA extractions and genotyping runs multiple times within the same individual.  We found that although DNA concentration didn’t change over time, DNA was much more fragmented in older samples. Despite this, the genotyping method we used (an Illumina iSelect SNP array) gave us more than 97% genotyping success and and error rate of < 0.2% when scanning more than 4,000 SNP markers in samples up to 35 years old.

callrate

Temporal variation of DNA quality in the Teno scale samples in 48 genotyping runs in 16 fish. A. Sample call rate and year. B. Sample call rate in relation to the proportion of DNA with a fragment size of > 1000bp. [NB. Samples in red come from a single fish which had a particularly low call rate and higher error rate. This sample would not have been included in any further genetic study.]

We were also interested to see if mixing DNA samples together could give us accurate estimates of allele frequencies. This is because SNP genotyping isn’t cheap – typing many individuals will soon add up to a high cost. However, if a genetic study only needs information on allele frequency, a genetic study could be theoretically be carried out using a handful of mixed DNA samples, rather than hundreds of individual DNA samples. We found that so long as we typed at least 30 individual samples to create a genotyping reference panel, mixed DNA samples gave highly repeatable allele frequency estimates (> 98.6% similar) and were highly correlated with the real allele frequencies within the pooled samples (99% similar).

Correlation between mean estimated allele frequencies and empirical allele frequencies within each pool. Means were calculated from nine replicates within each pool. R2 is the adjusted R2 values from a linear regression. N is the number of individuals included in each pool.

Correlation between pooled allele frequencies and real allele frequencies within each pool. Pooled allele frequencies shown here were calculated from nine replicates within each pool. R2 is the adjusted R2 values from a linear regression. N is the number of individuals included in each pool.

Overall, our findings gave us confidence that more detailed genetic studies are now much more achievable in old DNA samples as a result of SNP genotyping technologies. This is not just in Atlantic salmon – these methods are applicable to many different species. We have published our findings and conclusions in the journal BMC Genomics, along with detailed methods, results and recommendations for future studies.

Johnston SE, M Lindqvist, E Niemelä, P Orell, J Erkinaro, MP Kent, S Lien, J-P Vähä, A Vasemägi, CR Primmer (2013) Fish scales and SNP chips: SNP genotyping and allele frequency estimation in individual and pooled DNA from historical samples of Atlantic salmon (Salmo salar). BMC Genomics, 14:439. [Open Access Link]

A quick and easy function to plot lm() results with ggplot2 in R

Updated Apr 2015:

Sometimes it's nice to quickly visualise the data that went into a simple linear regression, especially when you are performing lots of tests at once. Here is a quick and dirty solution with ggplot2 to create the following plot:

Let's try it out using the iris dataset in R:

data(iris)
head(iris)
##   Sepal.Length  Sepal.Width  Petal.Length  Petal.Width    Species
## 1     5.1           3.5          1.4           0.2         setosa
## 2     4.9           3.0          1.4           0.2         setosa
## 3     4.7           3.2          1.3           0.2         setosa
## 4     4.6           3.1          1.5           0.2         setosa
## 5     5.0           3.6          1.4           0.2         setosa
## 6     5.4           3.9          1.7           0.4         setosa

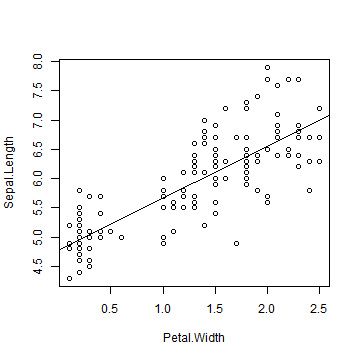
Create fit1, a linear regression of Sepal.Length and Petal.Width. Normally we would quickly plot the data in R base graphics:

fit1 <- lm(Sepal.Length ~ Petal.Width, data = iris)
summary(fit1)
## 
## Call:
## lm(formula = Sepal.Length ~ Petal.Width, data = iris)
## 
## Residuals:
##    Min       1Q      Median     3Q       Max 
## -1.3882   -0.2936   -0.0439   0.2643   1.3452 
## 
## Coefficients:
##               Estimate Std. Error t value Pr(>|t|) 
## (Intercept)    4.7776    0.0729    65.5   <2e-16 ***
## Petal.Width    0.8886    0.0514    17.3   <2e-16 ***
## ---
## Signif. codes: 0 '***' 0.001 '**' 0.01 '*' 0.05 '.' 0.1 ' ' 1 
## 
## Residual standard error: 0.478 on 148 degrees of freedom
## Multiple R-squared: 0.669, Adjusted R-squared: 0.667 
## F-statistic: 299 on 1 and 148 DF, p-value: <2e-16 
## 
plot(Sepal.Length ~ Petal.Width, data = iris)
abline(fit1)

This can be plotted in ggplot2 using stat_smooth(method = "lm"):


library(ggplot2)

ggplot(iris, aes(x = Petal.Width, y = Sepal.Length)) + 
  geom_point() +
  stat_smooth(method = "lm", col = "red")

However, we can create a quick function that will pull the data out of a linear regression, and return important values (R-squares, slope, intercept and P value) at the top of a nice ggplot graph with the regression line.

ggplotRegression <- function (fit) {

require(ggplot2)

ggplot(fit$model, aes_string(x = names(fit$model)[2], y = names(fit$model)[1])) + 
  geom_point() +
  stat_smooth(method = "lm", col = "red") +
  labs(title = paste("Adj R2 = ",signif(summary(fit)$adj.r.squared, 5),
                     "Intercept =",signif(fit$coef[[1]],5 ),
                     " Slope =",signif(fit$coef[[2]], 5),
                     " P =",signif(summary(fit)$coef[2,4], 5)))
}

After specifying this function, all you would have to run is:

fit1 <- lm(Sepal.Length ~ Petal.Width, data = iris)
ggplotRegression(fit1)

or even just

ggplotRegression(lm(Sepal.Length ~ Petal.Width, data = iris))

Disclaimer: This is not suitable for non-normal distributions or categorical variables!

Find and Replace in R, Part 1: recode in the library car

Background

Recoding a variable in R has never seemed like a straightforward task to me. In the next few entries, I will present the do’s and dont’s of different find/replace (recoding) solutions in R. Today: car::recode.

1. Recoding vectors:

Load the library car, and create a vector of random integers from 1 to 4:

library(car)
x <- sample(1:4, size = 10, replace = T)
x

##  [1] 4 2 3 1 1 1 4 1 1 3

Simply, the arguments of recode are:

  • The vector we wish to change
  • A list of the recodes, enclosed in single or double quotes, and separated by semi-colons.

Let’s start by recoding 1 2 3 4 in x to 2 5 8 10:

x1 <- recode(x, "1 = 2 ; 2 = 5 ; 3 = 8 ; 4 = 10")
x1

##  [1] 10  5  8  2  2  2 10  2  2  8

The same is true to recode 1 2 3 4 to A B C D:

x2 <- recode(x, "1 = "A" ; 2 = "B" ; 3 = "C" ; 4 = "D"")
x2

##  [1] "D" "B" "C" "A" "A" "A" "D" "A" "A" "C"

To recode 1 2 3 4 to 0 0 5 5, we can use several different approaches to achieve the same result:

x3.1 <- recode(x, '1 = 0 ; 2 = 0 ; 3 = 5 ; 4 = 5')     # specify individual values
x3.2 <- recode(x, 'c(1, 2) = 0 ; c(3, 4) = 5')         # vectors of values
x3.3 <- recode(x, 'lo : 2 = 0 ; 3 : hi = 5')           # lo and hi
x3.4 <- recode(x, '1 : 2 = 0 ; else = 5')              # specify some values and else for remaining values

Where all solutions give:

##  [1] 5 0 5 0 0 0 5 0 0 5

If we only need to change some of the values, only those values need to be specified. For example, to recode 1 2 3 4 to 1 2 3 5:

x4 <- recode(x, "4=5")
x4

##  [1] 5 2 3 1 1 1 5 1 1 3

We can do the same with character vectors. Let’s create one with some fish species:

y <- sample(c("Perch", "Goby", "Trout", "Salmon"), size = 10, replace = T)
y

##  [1] "Goby"   "Salmon" "Trout"  "Perch"  "Salmon" "Perch"  "Trout"
##  [8] "Goby"   "Perch"  "Salmon"

We wish to recode each fish into its biological order, i.e. Perch, Goby, Trout, Salmon will become Perciform, Perciform, Salmonid, Salmonid:

y1 <- recode(y, 'c("Perch", "Goby") = "Perciform" ; c("Trout", "Salmon") = "Salmonid"')
y1

##  [1] "Perciform" "Salmonid"  "Salmonid"  "Perciform" "Salmonid"
##  [6] "Perciform" "Salmonid"  "Perciform" "Perciform" "Salmonid"

2. Recoding Data Frames

Let’s create a simple dataframe, z:

z <- data.frame(Letter = sample(factor(letters[1:4]), size = 10, replace = T),
                Count1 = sample(c(1:4), size = 10, replace = T),
                Count2 = sample(c(1:4), size = 10, replace = T),
                Count3 = sample(c(1:4), size = 10, replace = T))
z

##    Letter Count1 Count2 Count3
## 1       a      1      2      3
## 2       a      2      1      3
## 3       a      3      4      4
## 4       c      3      3      2
## 5       b      1      2      4
## 6       a      4      3      3
## 7       d      3      4      3
## 8       b      3      2      4
## 9       a      4      3      4
## 10      b      3      3      2

In this data frame, we wish to recode 1 2 3 4 values to 2 5 8 10. Let’s do this by recoding the data frame to create a new object, z1:

z1 <- recode(z, "1 = 2 ; 2 = 5 ; 3 = 8 ; 4 = 10")

## Error: (list) object cannot be coerced to type 'double'

z1

## Error: object 'z1' not found

No, this didn’t work. It seems that recode only works with vectors.

We could try a for loop across all columns:

z1 <- z
for (i in 1:ncol(z)) z1[, i] <- recode(z1[, i], "1 = 2 ; 2 = 5 ; 3 = 8 ; 4 = 10")

gives:

z1

##    Letter Count1 Count2 Count3
## 1       a      2      5      8
## 2       a      5      2      8
## 3       a      8     10     10
## 4       c      8      8      5
## 5       b      2      5     10
## 6       a     10      8      8
## 7       d      8     10      8
## 8       b      8      5     10
## 9       a     10      8     10
## 10      b      8      8      5

By far, the best workaround is to use lapply

z1 <- lapply(z, FUN = function(foo) recode(foo, "1 = 2 ; 2 = 5 ; 3 = 8 ; 4 = 10"))
z1

## $Letter
##  [1] a a a c b a d b a b
## Levels: a b c d
##
## $Count1
##  [1]  2  5  8  8  2 10  8  8 10  8
##
## $Count2
##  [1]  5  2 10  8  5  8 10  5  8  8
##
## $Count3
##  [1]  8  8 10  5 10  8  8 10 10  5
##

But now we have lost our data frame! Let’s fix this with data.frame():

z1 <- data.frame(z1)
z1

##    Letter Count1 Count2 Count3
## 1       a      2      5      8
## 2       a      5      2      8
## 3       a      8     10     10
## 4       c      8      8      5
## 5       b      2      5     10
## 6       a     10      8      8
## 7       d      8     10      8
## 8       b      8      5     10
## 9       a     10      8     10
## 10      b      8      8      5

Conclusions

car::recode is a simple and powerful find/replace solution. However, it can be frustrating to write out recode lists when there are many values that need to be changed. In the next entry, I’ll present some alternative recoding solutions using gsub, indexing and others.

Creating a large scale map using ggplot2: a step by step guide.

* UPDATED 2nd SEPTEMBER 2013 *

Whenever I have needed a map in a presentation, I have always slipped in a cheeky screenshot from Google and prayed that the copyright police won’t burst into the door and arrest me (talks are stressful enough). However, I was determined to change this, and after extensive trawling of the web, I’ve put together a quick template to make a simple large scale map for talks, presentations and posters using GIS shape files and ggplot2.

Here is the finished object (full code at the end of this page):

Europe Map

I started by downloading this excellent world map template from thematicmapping, and loading it into R using the maptools package:

library(maptools) 
gpclibPermit() 
## [1] TRUE 
worldmap <- readShapeSpatial("world_borders.shp") 

*** NB: You will require the library gpclib to read in the shapefile – if gpclibPermit() returns FALSE, then try installing gpclib again. As of Sep 2013, gpclib was not working in R v3.0.1. Argh. ***

The fortify function in ggplot2 will convert this to a data frame:

library(ggplot2)
worldmap <- fortify(worldmap) 
## Using CAT to define regions. 

Let’s have a quick look:

head(worldmap) 
## long lat order hole piece group id 
## 1 -69.88 12.41 1 FALSE 1 1.1 1 
## 2 -69.95 12.44 2 FALSE 1 1.1 1 
## 3 -70.06 12.53 3 FALSE 1 1.1 1 
## 4 -70.06 12.54 4 FALSE 1 1.1 1 
## 5 -70.06 12.54 5 FALSE 1 1.1 1 
## 6 -70.06 12.62 6 FALSE 1 1.1 1 

Essentially, this data frame is a list of paths/polygons (each one is part of a unique ‘group’) that we can plot using geom_path and geom_polygon. There are more than 400,000 points in this map which makes plotting quite slow, so I created a smaller data frame, worldmap2, to create rough maps for initial tweaking and formatting.

worldmap2 <- worldmap[seq(1, nrow(worldmap), 200), ] 

A quick plot using geom_polygon, creating groups based on the variable ‘group’:

ggplot(worldmap2, aes(x = long, y = lat, group = group)) + 
  geom_polygon() 

Grouped Map

The same with geom_path:

ggplot(worldmap2, aes(x = long, y = lat, group = group)) + 
  geom_path() 

Path map

And using both (Put geom_path second in order to plot the borders):

ggplot(worldmap2, aes(x = long, y = lat, group = group)) + 
  geom_polygon() + 
  geom_path() 

Group and Path Map

Changing the colour of the polygons and path is straightforward:

ggplot(worldmap2, aes(x = long, y = lat, group = group)) + 
  geom_polygon(fill = "darkseagreen") + 
  geom_path(colour = "grey40") 

Coloured map and path

Creating a blue blackground required delving further into the mysterious world of theme(). I also changed the colour of the plot border and major grid lines to reduce the contrast slightly:

ggplot(worldmap2, aes(x = long, y = lat, group = group)) + 
  geom_polygon(fill = "darkseagreen") + 
  geom_path(colour = "grey40") + 
  theme(panel.background = element_rect(fill = "lightsteelblue2", colour = "grey"),
       panel.grid.major = element_line(colour = "grey90")) 

unnamed-chunk-11

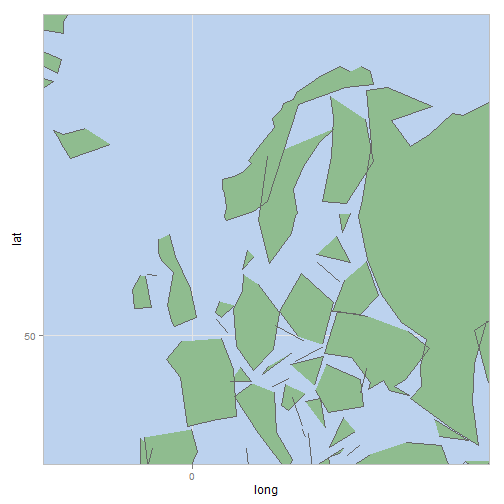
I wanted a map of Northern Europe, so I defined my latitude and longitude limits, and used coord_cartesian to zoom in onto the graph. With this mapfile, you can change latlimits and loglimits to your specific region of interest:

latlimits <- c(40, 75) 
longlimits <- c(-25, 50) 

ggplot(worldmap2, aes(x = long, y = lat, group = group)) + 
  geom_polygon(fill = "darkseagreen") + 
  geom_path(colour = "grey40") +
  theme(panel.background = element_rect(fill = "lightsteelblue2", colour = "grey"), 
       panel.grid.major = element_line(colour = "grey90")) +
  coord_cartesian(xlim = longlimits, ylim = latlimits) 

unnamed-chunk-12

The scales are still more suited to the full graph, so now we can define our scale to be more relevant.

ggplot(worldmap2, aes(x = long, y = lat, group = group)) + 
  geom_polygon(fill = "darkseagreen") + 
  geom_path(colour = "grey40") +
  theme(panel.background = element_rect(fill = "lightsteelblue2", colour = "grey"), 
       panel.grid.major = element_line(colour = "grey90")) + 
  scale_y_continuous(breaks = seq(40, 70, 10)) + 
  scale_x_continuous(breaks = seq(-20, 40, 20)) +
  coord_cartesian(xlim = longlimits, ylim = latlimits) 

unnamed-chunk-13

Now time to customise the graph a little more: removing the axis titles, relabelling the axes, removing the axis ticks, and making the text larger. Then we can use the original worldmap data frame to produce the final product:

# Final code:

library(maptools)
require(gpclib)
gpclibPermit()
worldmap <- readShapeSpatial("world_borders.shp")

library(ggplot2)
worldmap <- fortify(worldmap)

latlimits <- c(40, 75) 
longlimits <- c(-25, 50) 

ggplot(worldmap, aes(x = long, y = lat, group = group)) + 
  geom_polygon(fill = "darkseagreen") + 
  geom_path(colour = "grey40") + 
  theme(panel.background = element_rect(fill = "lightsteelblue2", colour = "grey"), 
       panel.grid.major = element_line(colour = "grey90"),
       panel.grid.minor = element_blank(),
       axis.ticks = element_blank(), 
       axis.text.x = element_text (size = 14, vjust = 0), 
       axis.text.y = element_text (size = 14, hjust = 1.3)) + 
  coord_cartesian(xlim = longlimits, ylim = latlimits) + 
  scale_y_continuous(breaks=seq(40,70,10), labels = c("40ºN", "50ºN", "60ºN", "70ºN")) + 
  scale_x_continuous(breaks=seq(-20,40,20), labels = c("20ºW", "0º" ,"20ºE", "40ºE")) + 
  labs(y="",x="") 

Europe Map